

Software updates
With the new PreForm functions, you can customize your parts and increase efficiency

Jan
Formlabs is known for high usability and intuitive workflows in their 3D printing ecosystem. They want to offer the same in print preparation. Each update of the free PreForm print preparation software serves this purpose. The available tools are expanded, printing is accelerated, the printing success rate is increased and post-processing workflows are simplified.
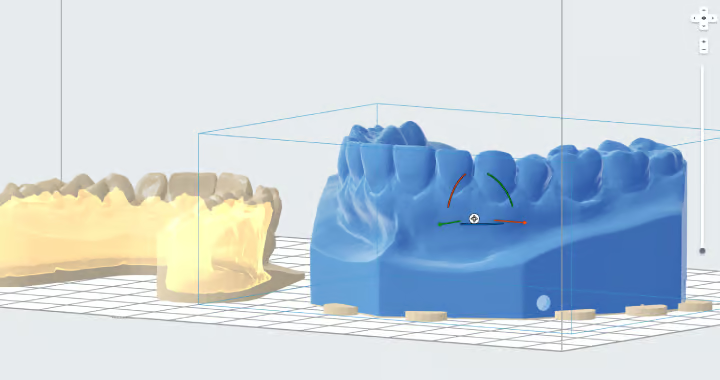
The latest PreForm update boasts new tools for print preparation. You can now hollow out components and drill holes in PreForm for both the SLS 3D printers of the Fuse series and the stereolithography 3D printers of the Form series (SLA). This ensures lower material consumption and therefore faster printing and lower costs.
You can also add texture and labeling to SLS and SLA parts. With texturing, parts can achieve surface finishes of injection-molded parts for the end user. Labeling improves the traceability of parts. Be it during post-processing, assembly or delivery. In this way, marking ensures efficient and controllable work processes.
The “Part Cage” is an additional tool available for SLS 3D printers. These“model cages” are intended for the series production of small, sensitive parts. The cage encloses the parts, which simplifies component removal and post-processing. Components can also be grouped together.
In addition, native CAD files can now be imported into PreForm in beta status.
Hollow out models and add holes in PreForm
Hollowing out models reduces the amount of material used for printing. However, hollowed-out parts are not as stable as solid parts. For this reason, we do not recommend using this function for functional parts. We also strongly recommend adding drainage or ventilation holes to the model using the “Holes” tool. This will ensure that the resin can drain out of the cavity and no suction cups are created. You will be made aware of suction cups in PreForm in the “Pressure validation” section and in the model by yellow hatching. You can eliminate these by reorienting or, as already mentioned, by adding holes. If necessary, only the combination of these two tools can prevent printing errors in SLA 3D printing.
Guidelines for hollowing out SLA components:
- Avoid making the walls too thin, as this can lead to printing errors.
- Add drainage holes. Otherwise resin can accumulate in the cavity, which can lead to misprints.
- The drain hole should be placed on the underside of the part so that the resin can drain away by gravity.
- Too many drain holes compromise the structural integrity of the part, which can lead to printing errors.
New tools for designing models in PreForm
Add texture
With the texture tool, textures and patterns can be transferred to the surface of 3D print models in PreForm. Texturing changes the surface texture of the models. This changes the look and feel of the 3D-printed parts. You can easily achieve a customized surface finish. We therefore recommend experimenting with patterns and textures and adjusting the settings to find out what works best for your application.
Note: Using this tool can slow down the performance of PreForm.
Add component labeling
Previously, components had to be labeled in separate software. In other words, before they were loaded into the PreForm print preparation software. Now you can label components directly in PreForm – anywhere on a model. You can emboss or engrave the lettering on the models. You can adjust the size of the lettering and define the depth of the engraving or the height of the embossing.
Markings are essential in the healthcare sector. They are used to track the parts from the model through post-processing to the finished part. Labeling ultimately ensures that parts adapted to the patient reach the intended recipient.

In many other industries, the marking of parts is also of great importance in order to minimize communication errors and increase efficiency.
Improve identification by labeling parts with serial numbers, lot numbers, customer names or other relevant information. This facilitates traceability and improves identification throughout the entire process chain. In this way, you reduce the risk of mix-ups, having to invest additional effort in part identification or interrupting work processes. Marking reduces the potential for errors and ensures that processes are kept as efficient as possible.
Simplified series production of small parts using the SLS process
Small or sensitive parts tend to get “lost” in the “cake” of the SLS 3D printer. Post-processing such parts is therefore laborious and time-consuming. It requires greater concentration and additional care. With the Part Cages tool, you can enclose the small parts with a cage at the click of a mouse.
This enables small parts to be reworked in batches. This reduces the time required to clean each individual part and you can ensure that you have all the parts you need at the end. Clean the cage in the Fuse Sift with the brush and shake out the powder. On the one hand, the cage helps to make the small parts tangible during manual blasting. On the other hand, it protects delicate parts from damage during automatic blasting with other parts, e.g. in the Fuse Blast. You can then simply break open the cage with pliers or a Dremel and remove the small parts.

Recommendations for using the cage tool:
- We recommend a slat thickness of 1.5 mm. In most cases, this is sufficient to ensure that the structure remains intact during reworking. At the same time, it can be easily broken open after reworking. We recommend using pliers or a Dremel to open the cages. However, with a strip thickness of 1.5 mm, the cages can also be opened by hand. Wear eye protection when opening the cages.
- Make sure that the distance between the bars – i.e. the size of the holes in the cage – is smaller or the same size as the parts in the cage. These should not fall out. However, the larger the holes, the easier it is to clean and the less powder is used.
Grouping of models in the SLS process
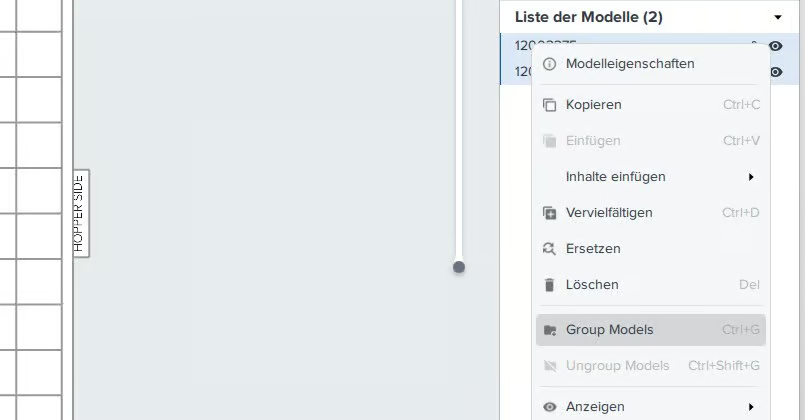
The latest version of PreForm also includes a function for grouping models. In the PreForm model list, it is now possible to group models into a single folder. This can help to organize the PreForm workspace, make packing larger builds easier and streamline some workflows.
You can either save the assemblies from CAD separately in folders and then import the folders into PreForm. Or you can import individual models as before. Then select the desired models in the “List of models” section and click the right mouse button. Now you can select “Group Models”, which will group them into folders. You can also use the shortcut Ctrl+G for this.
Use the new PreForm tools
In just a few minutes, you can use the free PreForm software to automatically prepare your 3D models for printing with Formlabs 3D printers. New tools make it even easier to customize your models and increase workflow efficiency. This allows you to produce the parts you want at a lower cost. In addition, integrations and partnerships with leading CAD software ensure an efficient, intuitive workflow when moving from design to print. Try out the option to import from CAD files directly into PreForm, which is still in beta status.
The following file formats are currently supported:
- STEP files (STEP, STP, STPZ)
- SOLIDWORKS Files (SLDPRT, SLDASM)
- PTC Creo Files (PRT, ASM)
- Jupiter Tessellation Files (JT)
- CATIA V5 files (CATPart, CATProduct)
In order to use the new PreForm functions, you need the latest version. Existing users navigate to the Help menu and click Check for Updates. New users can download the Formlabs PreForm software for free.
Download PreForm